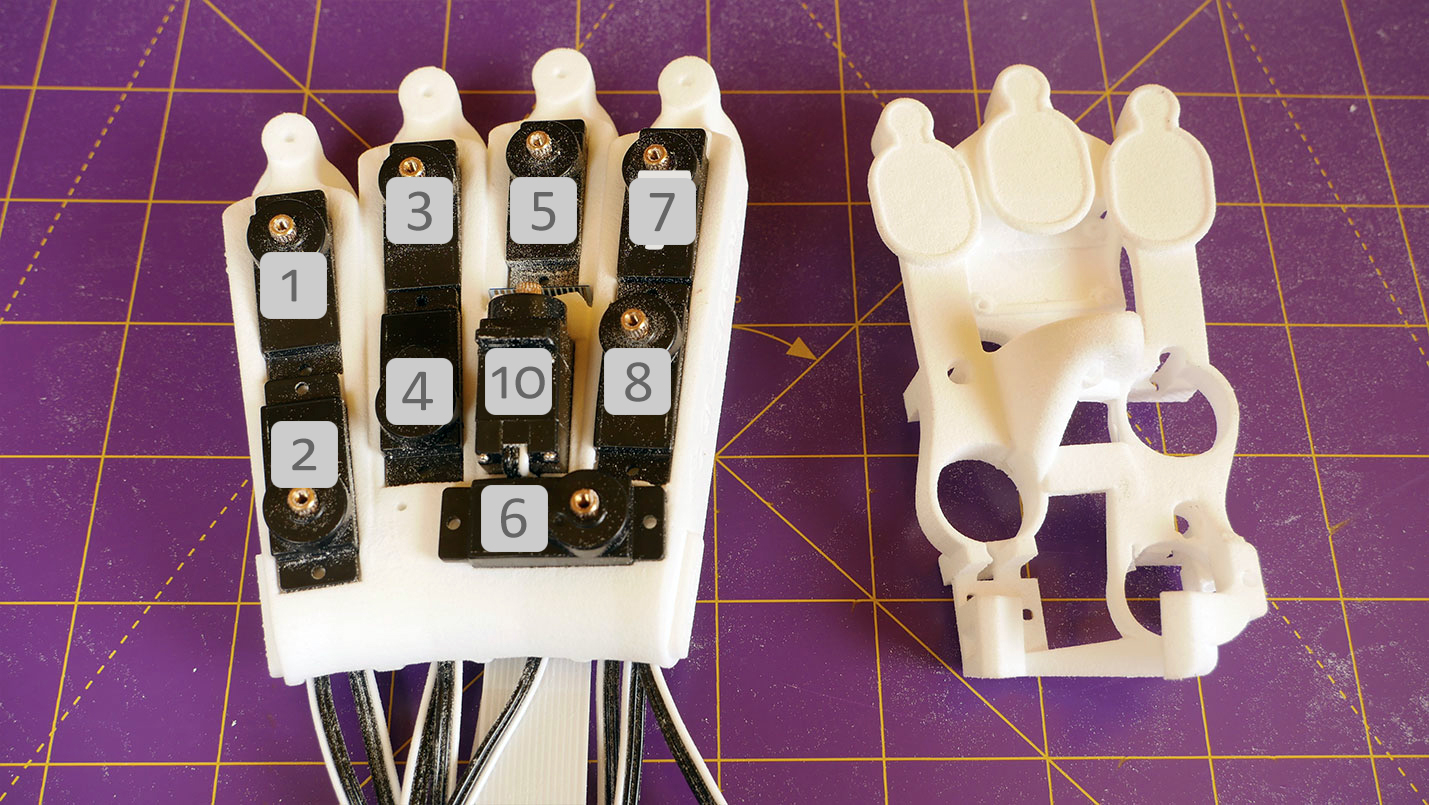
In this step, the servos programmed in Step 3 are installed into the large palm print that forms the main body of the hand.
Tools needed:
1. Small screwdriver or similar thin pokey object.
Parts needed:
1. All the small SCS009 servos except 9.
2. A 30cm long cable for the Raspberry Pi camera.
Start with the four servos that move the finger knuckles from side to side, this rotation is known as yaw.
Note how the cables should be positioned before insertion (1.19) and take care not to twist them as the cables of the knuckle servos (1, 3, 5 & 7) lie flat beneath the tendon servos (2, 4, 6, 8 & 10).
The plugs on the servo leads pass through the channels in the palm and out the rectangular holes that exit towards the wrist (1.22).
Here we can see the final position of servos 1 to 9 and the ribbon cable that connects to the Raspberry Pi camera mounted in the palm.
Also shown is one of the inner palm sections that screws to the palm to secure the servos.
This is the large one for the first three fingers and the base of the thumb, there is an additional small one for the little finger (3.46).
Line up the large cirular holes with the servo outputs to check that the servos are positioned correctly (7.02).

Once the servos are in place it’s time to start attaching the fingers to the palm in Step 5!
Next thread the electrical wires through the palm and insert servos 2, 4 & 8.
Before fitting the last two servos insert the camera ribbon cable as it passes between the electrical wires. Note the standard cable that comes with a Raspberry Pi camera is not long enough (7.20).
Use a screwdriver to help guide the cable as it passes through the tunnel (8.46).
This can be facilitated by carefully adding a slight bend to the blue plastic at the end.
Next thread the electrical wires through the palm and insert servo 10 followed by servo 6 (9.20).
Check that all the servos insert fully down into the palm (10.54).
It's a good idea to keep the FT software running and check all the servos function as expected after assembly, i.e. they should all still work!
Now that the servos are installed it’s time to start attaching the fingers and thumb in Step 5!
| Cookie | Duration | Description |
|---|---|---|
| cookielawinfo-checkbox-analytics | 11 months | This cookie is set by GDPR Cookie Consent plugin. The cookie is used to store the user consent for the cookies in the category "Analytics". |
| cookielawinfo-checkbox-functional | 11 months | The cookie is set by GDPR cookie consent to record the user consent for the cookies in the category "Functional". |
| cookielawinfo-checkbox-necessary | 11 months | This cookie is set by GDPR Cookie Consent plugin. The cookies is used to store the user consent for the cookies in the category "Necessary". |
| cookielawinfo-checkbox-others | 11 months | This cookie is set by GDPR Cookie Consent plugin. The cookie is used to store the user consent for the cookies in the category "Other. |
| cookielawinfo-checkbox-performance | 11 months | This cookie is set by GDPR Cookie Consent plugin. The cookie is used to store the user consent for the cookies in the category "Performance". |
| viewed_cookie_policy | 11 months | The cookie is set by the GDPR Cookie Consent plugin and is used to store whether or not user has consented to the use of cookies. It does not store any personal data. |

